The Yellow Farmhouse Garden

May 30, 2019

Epsom salts for better roses

In order to grow  and flourish all plants, including roses, require basically the same nutrients. One is carbon which is supplied to the plant by carbon dioxide in the air. Another, even though we may not think of it as a nutrient, is water.

In the soil, there are three primary nutrients that plants use in large quantities: nitrogen (N), phosphorus (P) and potassium (K). Together the primary nutrients are known as NPK. Good garden soil usually contains much of the required NPK . But sometimes soil is low in one or more of the primary nutrients so we supplement it with either organic or conventional fertilizers.

Secondary nutrients are need but in far less concentrations. They include calcium, magnesium and sulfur.

A long time ago rose growers noticed, even though roses were growing in very fertile soil, sometimes their blossoms still weren’t as nice as roses in other gardens. After much trial and error they found by adding Epsom salts, roses blooms would be noticeably improved. The missing ingredient was magnesium supplied by magnesium sulfate, more commonly known as Epsom salts.

The same Epsom salts you use in your bathwater can be used for your roses.

The same Epsom salts you use in your bathwater can be used for your roses.

There are other sources of magnesium but some of them like dolomitic limestone can raise the soil pH. That would cause problems if your soil pH was already on the high side.

Add Epsom salts at the beginning of the growing season. For each mature rose bush apply a half cup of Epsom salts to the soil around the bush. You can do this either in dry form and water it in or dissolve it in water and apply as a solution. Do this every year to replace any magnesium used by the plant or leached out of the soil.

Bob


November 15, 2018

Tree leaves help build soil

I’m running behind in my fall garden projects including taking care of the fallen leaves all over my lawn. Maybe it just feels like I’m behind because of the snow we’ve been having recently.

This past weekend while driving back from up north, I spotted several people catching up on their fall tree leaf clean up. They were easy to spot because of the plumes of smoke rising up from their lawns and ditches. By the way, this was happening out in the countryside where leaf burning is still fairly common.

I enjoy the smell of burning leaves as much as the next guy. When I smell leaf smoke, it reminds me of my childhood when nearly everyone in the neighborhood burned their leaves. It actually was a pretty good tactic to get the kids out of the house. As a matter of fact, the neighborhood kids looked forward to raking the lawn because of the fire afterward.

Of course nowadays most communities have ordinances restricting leaf burning. And Michigan has a state law regulating open burning of leaves so we don’t see or smell much of it anymore.

As much as I enjoy it, as a gardener I wouldn’t burn leaves even if it were allowed. They are just too valuable as a soil amendment to let them just go up in smoke.

Valuable soil building components found in leaves are destroyed by burning.

Valuable soil building components found in leaves are destroyed by burning.

I you think about it for a bit, trees have huge root systems that absorb soil minerals from a deep and wide area, nutrients that may not be available to other kinds of plants. Those soil nutrients, along with carbon from the atmosphere, are used by trees to make their leaves. That’s a lot of plant nutrients that trees make for us when you consider the shear volume of leaves each tree produces every year.

The mineral components of the leaves quite are valuable, providing much more fertilizer value than manure. Even more valuable than the mineral elements are the carbon compounds that make up the bulk of a leaf. When leaves break down in the soil they provide humus, that magical ingredient that experienced gardeners know is the secrete to a flourishing garden.

I remember several years ago a friend of mine used to pick up bagged up leaves from the curbside in the city and take them home to use because she didn’t have access to enough leaves. One day just as my friend was about to depart with a van full of bagged leaves, the homeowner came running out of the house shaking her fist and yelling, “put those leaves back!”  The funny thing is those leaves were about to be picked up by the trash collectors and taken to the landfill.

The biggest drawback to leaves is their tendency to blow around and not stay put where they are needed. That can easily be taken care of by cutting them up into smaller pieces. I use a leaf vac with a collection bag to shred and collect most of my leaves. Some of the heavier and tougher leaves like cottonwood, I run over with a lawn mower first to make them easier to vacuum up. Then they either go right into the garden as a mulch or into to the compost pile if there are any left over.

Instead of looking at leaves as trash that needs to be bagged up and hauled away, I like to consider them free soil builders provided by mother nature every year. In case you were wondering, my friend did manage to escape with her misbegotten load of contraband.

Bob


April 24, 2018

An intensive way of building garden soil

A couple of posts ago I discussed a hands-off style of flower gardening that works some in established gardens. In those cases the soil is usually in pretty good shape after having had plants growing in the same spot for many years. Not everyone is fortunate enough to have such a garden space.

Sometimes the soil in a potential garden spot requires a lot of work before it is fit to grow vigorous plants. Take for example the case of the typical yard of a newly constructed home. It’s not unusual for the builder to remove the existing topsoil and haul it away to be sold. Then, usually, soil excavated for the basement is spread over the new yard area leaving the new homeowner to struggle with the poor soil. The homeowner often ends up buying topsoil (most likely from a different housing project) to add to the yard.

New topsoil may be adequate to grow a lawn but not necessarily good enough to grow flower and vegetable plants. In that case, the laissez-faire method of gardening will have to be put on hold until the garden has built up fertility and the soil structure has improved. That may take years or decades without major help from the gardener.

There’s a way to drastically improve a garden spot so it can be in tip-top shape the first year. It’s a method called “double digging”. Double digging is not for the faint of heart. I did it one time many years ago for a problem area and I can tell you it’s a heck of a lot of work but the results were impressive.

I suggest starting with a small garden bed in case you run out of energy or patience before the project is done.

A sturdy garden fork is an essential tool for double digging and general garden work.

A sturdy garden fork is an essential tool for double digging and general garden work.

Start by digging a trench about a foot wide and the depth of of your shovel along the entire lenght of one side of your new bed. Pile the soil from the trench along side your excavated area. Then insert a garden fork into the soil of the bottom of the trench. Use the tines to break up that layer of dirt and incorporate some compost as deep as you can.

Dig another trench along your original trench, again over the entire length of that same side. Take the soil  that you remove from digging  your second trench and place it into your original excavation, right on top of the loose soil and compost. Once the second trench is done, dig another and another until you eventually reach the far side of the bed. Fill the final trench with the soil that you took out of your very first trench.

The final step is to spread more compost over the entire garden bed and deeply dig it in to the soil with your garden fork. If you plan to add fertilizer, now would be the time.

The soil will be fluffy and full of air-pockets so you’ll need to water the area a few times to help settle the soil before planting.

In some gardens, double digging seem like over-kill but in certain circumstances it’s the ideal way to build a garden bed.

Bob


March 21, 2018

Save wood ashes to use in the garden

Filed under: Fertilizers — Tags: , , , , , — bob @ 4:11 pm

If you enjoy regularly using your fireplace or wood stove, you know that a fair amount of wood ashes can be accumulated over a heating season. Under the right circumstances, those ashes can be an excellent fertilizer for your garden.

Wood ashes contain about ten percent potassium, one of the three major elements needed by plants to grow and survive. That is a relatively high percentage of potassium for a no-cost,naturally occurring material that is easily available. It doesn’t need to be mined from the ground, packed and shipped long distances to a garden center.

Many natural sources of potassium like greensand release their nutrients very slowly over a period of moths or years. Wood ash potassium is in a form that is very water soluble making it immediately available for plants to use. Because of this high solubility, potassium is quickly lost if the ashes are stored where it can be rained on. The rain water essentially washes away the potassium, so it’s important to store ashes in a dry area.

Calcium, at about sixty percent, is the other major constituent of ashes. It is in the form of calcium carbonate, the same compound that makes up agricultural limestone. When soil pH is too low, the soil chemistry changes to the point where the nutrients are no longer available to the plants. So farmers and gardeners add limestone to raise the pH to the optimum for plant growth.

Ashes contain trace amounts of micro-nutrients too. Those are essential nutrients that are needed for plant growth but only in tiny amounts compered to the three major nutrients of nitrogen, phosphorus and potassium.

Depending on soil conditions about thirty to one hundred pounds of limestone is commonly added to a thousand square feet of garden. However, only about three to ten pounds of wood ashes are required to do the same thing, about one-tenth the amount. Why is that so if wood ashes and limestone are both made of calcium carbonate? It’s because the particles of wood ashes are so small that the calcium is immediately  available while even finely ground limestone has to break down even further in order to work.

Wood ashes work so quickly to raise soil pH that there is a danger that the soil pH can quickly get too high and cause other problem for your plants. It’s always a good idea to check your garden’s soil pH to get an idea on how much wood ashes to apply.

Bob


April 13, 2017

What a soil test result readout looks like

You’ve read it here in this blog, you’ve heard it from your neighbor, even your Aunt Bootsie told you to get a soil test for your garden.  I’ve always recommended using the soil testing lab at Michigan State University, it’s the “gold standard” of soil labs in Michigan. For most gardens a basic test will provide you with all the information you’ll need.

In past blogs I’ve described how to properly take a soil sample for testing and what to do with it once you’ve collected it, so we won’t discuss that today. Instead we’ll look at actual soil test results.

Once you’ve rounded up a bag of dirt, sent it to the lab along with your payment, the MSU soil lab will test your sample, processes the results and send you the test results either by email or by mail. That usually happens within ten days.

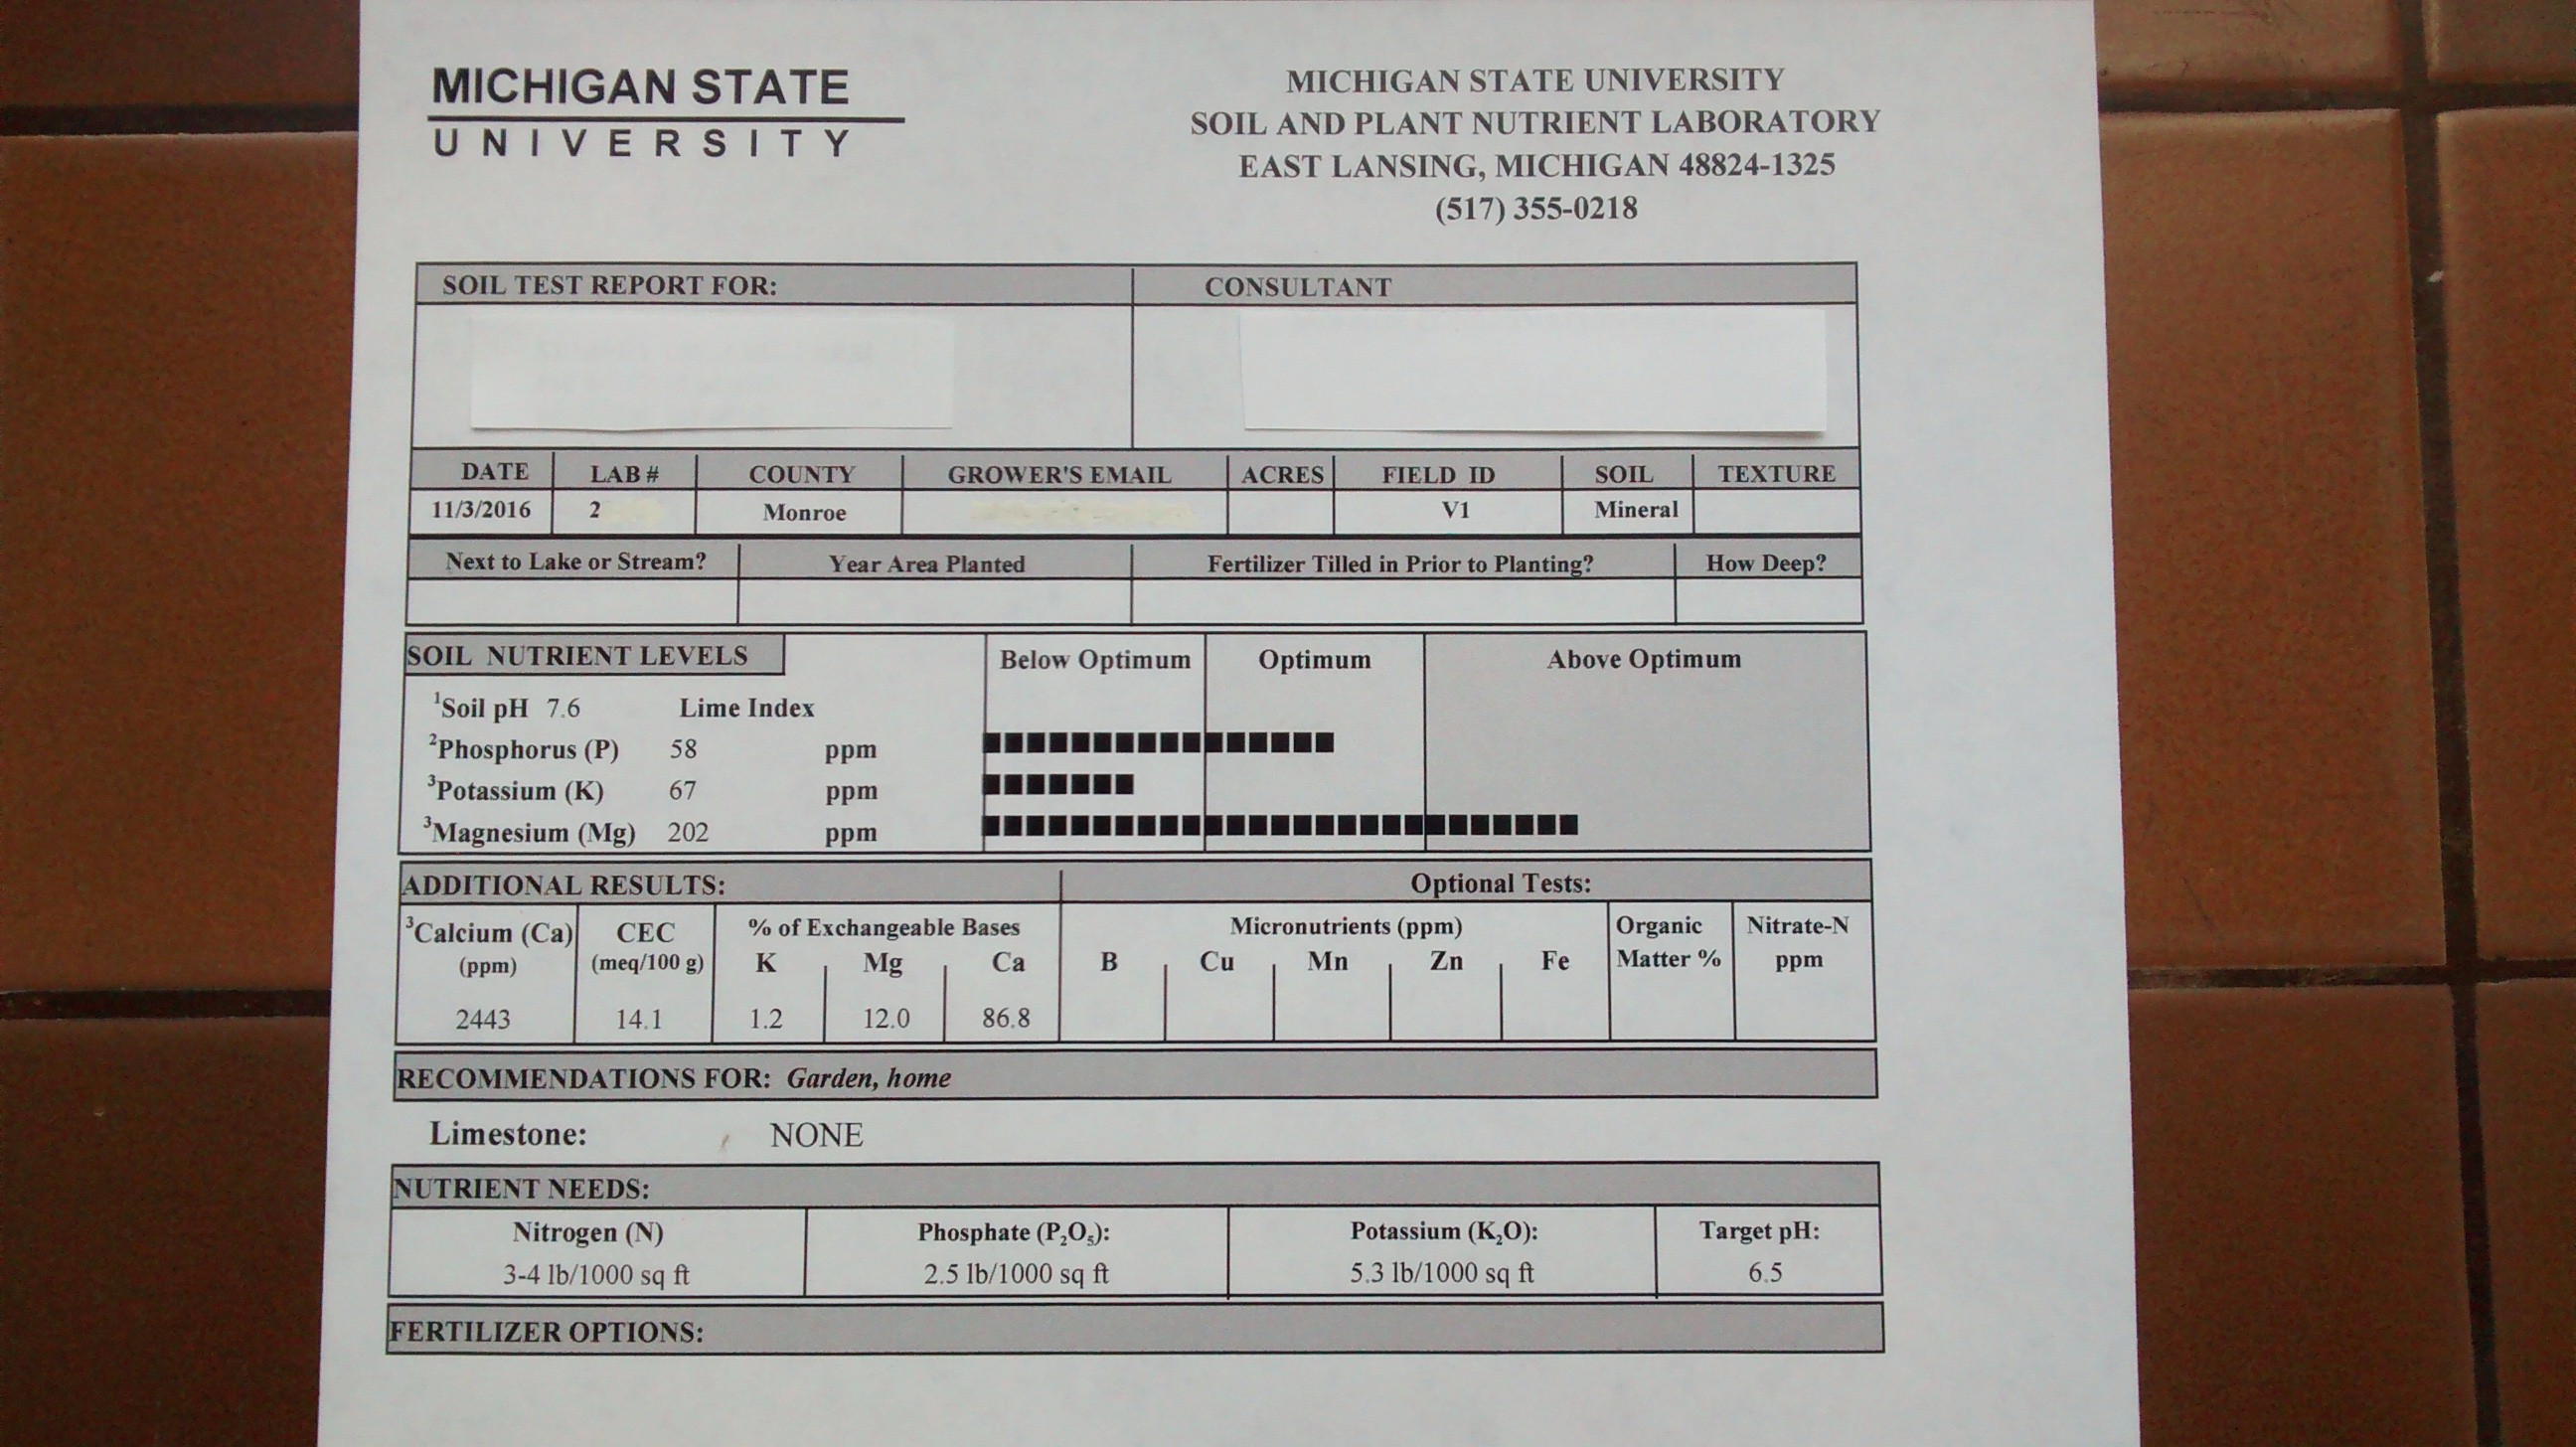
Let’s take a peek at an actual soil test readout I received last fall.

A basic soil test result readout.

A basic soil test result readout.

The first test result is the soil pH. pH describes how acid or how alkaline your soil is with “7″ being neural. In this case the sample result is 7.6 which is somewhat alkaline. So right away we know we won’t have to add any lime to raise the soil pH since most garden plants grow best in a slightly acidic soil.

Next is the result for phosphorus, the “P” in NPK. The result came back at 58 ppm (parts per million) which, according to the graph is well in the optimum range.

Following P we see that is the potassium (K) is 67 ppm which we see is below optimum. Magnesium (Mg) at 202 ppm is above the optimum range.

Calcium(Ca), shown in the additional results section is 2443 ppm which helps to explain the relatively high soil pH reading since calcium will raise soil pH.

The next result is CEC (cation exchange capacity) this tells us how well the soil is able to retain soil nutrients. A reading of 14.1 tells us we can add fertilizer to this garden without having it leach out of the soil. Usually, soil types with a higher percentage of clay in their make-up have a higher CEC and therefore are inherently more fertile because of all the retained nutrients. Very sandy soils have low CEC values. It is very difficult to change the CEC of a soil. On the other hand, we can easily raise the NPK values by simply adding fertilizer.

Those cations (positive-charged ions) that are being described in the CEC reading are mostly K, Mg and Ca. There is a section in the readout providing the percentage of each of those. Phosphorus is not listed there because it exists in the soil as negatively charged anion (PO4 3-).

Nitrogen (N) is not tested for at MSU because soil nitrogen levels change with the temperature and other variables so you would never get an accurate reading.

We don’t have room here to discuss the soil science behind the results. Fortunately, the soil lab boils it all down to some simple recommendations at the bottom of the readout.

The nutrient needs are listed as actual pounds of each element per 1000 square feet. Since fertilizer is not sold as pure nitrogen, phosphorus or potassium, the precise amount of any type of fertilizer must be mathematically calculated. Back in the olden days when I was an MSU Extension Agent and the results were printed with a dot-matrix printer, I made those calculations by hand on hundreds of test results. Nowadays MSU has an online calculator that you can use to figure out how many pounds of fertilizer you would need to apply.

With the planting season rapidly approaching,I suggest you get your soil sample to the lab ASAP. Much like your income tax return; the sooner you send it in the sooner you’ll see your results.

Bob


Older Posts »

Powered by WordPress