The Yellow Farmhouse Garden

April 28, 2016

Be sure your garden soil is ready to till in the spring

Filed under: Soil — bob @ 9:40 am

We’re fast approaching garden tilling time. It’s not unusual around here to see gardeners preparing their soil by the first week of May. But the calendar is not the best indicator for deciding when to begin working your garden soil.

Tilling a garden at the wrong time can be damaging for certain types of soil. That is why it’s good to know when to till. Tilling too soon in the spring can be disastrous for a garden.

Gardeners make gardens in all types of soil: sand, loam, clay or, more often, a combination of two or more of these types. Short of hauling in new topsoil, there is nothing you can do to change soil type. Adding compost will vastly improve a soil’s ability to sustain plant growth but will not change the soil type.

Soil structure is different than soil type. Soil type refers to the size of the soil particles and the percentage of the different particles. Sandy soils have the largest particles while clay has the smallest, silt falls somewhere in between.

The garden soil in our upper garden is OK to till.

The garden soil in our upper garden is OK to till.

Soil structure refers to the arrangement of the sand, silt and clay particles in the soil. In soils with good structure , the soil particles are clumped together. That gives adequate space between the particles allowing water and air movement into the soil.  That provides the ideal environment for plant growth.

Tilling too soon can destroy soil structure making it difficult for plant roots to grow. In the spring, the limiting factor is soil moisture.

Sandy soils are the most forgiving soil type. In a garden setting, sandy soils can be quite wet and still be tilled without doing much harm to the soil structure. On the other hand, loam or clay type soils are much more susceptible to soil structure damage caused by early tilling.

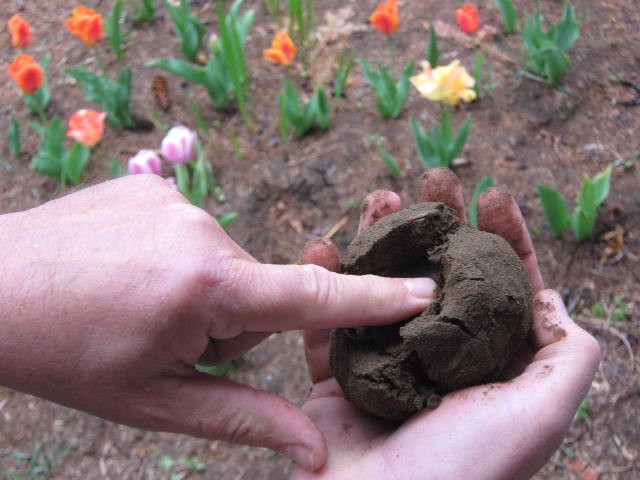
There’s a simple test you can do right in the garden to help you decide when it’s time to till your individual garden. Scoop up a handful of soil and roll it into a ball. Lightly poke it with your finger. If it falls apart easily, it’s OK to till. If the ball holds together it is too wet to till. Let the garden dry out and try the test again later.

By getting into the garden early you may gain a couple of weeks of growing time but make sure your garden soil is ready to start the same time you are.

Bob


Save downtime and money by servicing your hard-starting outdoor power tool

Filed under: Equipment — bob @ 7:18 am

Winter is the time when outdoor gardening stops and gardeners move indoors to get their power equipment ready for spring.

I took care of most of my equipment this winter, but not all. As the weeks went by, some things got pushed to the back of the storage shed. It’s like they went into hibernation and are just now waking up to see the light of day.

This week I dragged all my power tools outside to make sure they would start. All ran fine except one. It is powered by a two-cycle engine — sometimes called a two-stroke engine. You know, one of those that you have to mix oil into the gasoline. String trimmers, chainsaws, leaf blowers are some of the most common tools that use this type of engine.

A two-cycle outdoor tool that has lost its power or won’t start or is hard to start, probably has carbon build up on the exhaust port. And that’s exactly what happened to mine.

Two-cycle engines require unobstructed air flow to run properly. After many hours of use, carbon deposits inevitably  build up on the exhaust portion of the engine –especially if it is run at slow speeds — making it hard or impossible to start.

Fortunately, cleaning those carbon deposits are a doable project for someone with a little mechanical know-how. It’s a good project to try if you want to progress beyond blade sharpening or oil changing.

Here’s one way to do it.

For safety sake it’s always a good idea to get into the habit of disconnecting the spark plug wire whenever working on gasoline powered engines.

Remove the heat shield from the muffler.

Then un-bolt the muffler from the engine which will expose the exhaust port. You’ll be able to see the carbon caked onto the exhaust opening.


This is what a typical exhaust port looks like.

This is what a typical exhaust port looks like.

Slowly pull on the starter rope to bring the piston up to cover the port opening. That will keep loose particles from falling into the cylinder. Stray particles inside the cylinder will cause scoring of the piston and cylinder walls, then you’ll have a bigger problem to deal with than just carbon deposits.

Use a small piece of hardwood sharpened to a point– or a screwdriver if the carbon is really tough — to carefully scrape off the carbon. Don’t dig into the underlying metal and be extra careful not to scratch the piston!

Once you have the carbon loose, vacuum it up with your shop vac.

Remove carbon deposits from all muffler parts.

Remove carbon deposits from all muffler parts.

Check the muffler and other parts for carbon build up too before you reassemble everything.

If your exhaust system includes a screen, make sure it is clean.

If your exhaust system includes a screen, make sure it is clean.

The engine should start easily and will have more power. This is the first thing a repair shop will do when they get a two-stroke engine . So it makes sense to try this first before taking it into the repair shop. You’ll save money and be able to use your machine right away instead of waiting weeks for it to get repaired.

Bob


Let the world know you care about pollinators

Filed under: Bees,Insects — bob @ 7:13 am

While you’re deciding on what plants to add to your garden and landscape this year, think about pollinator friendly plants. By now most gardeners are aware of the steady decline in the number of pollinators over the past several decades. Bees, butterflies, moths, beetles and other pollinators have all taken a hit.

A large percentage of the foods we eat, over thirty percent, depends on pollinators. Plus, add to that, all of the different wild plants that depend on pollinators and you can see why it is such a problem. Even the federal government has acknowledged it be a matter of national security.

Planting even a few pollinator friendly plants in a garden will help, however more is better in this case.

Even though the situation is serious for pollinators, helping them doesn’t have to be a drag. The National Pollinator Garden Network has come up with a fun way to help us help pollinators. It’s called the Million Pollinator Garden Challenge. The organization hopes to register one million gardens, both existing and new,  that are pollinator friendly.

They suggest six simple to understand guidelines to help you with your pollenator garden. And if you want to take it to the next step, their website has loads of information to guide you.

Our own Michigan State University has been scientifically studying the pollinator decline and has a wonderful website tailored to the three general ecosystems in our state: Southern Lower Peninsula; Northern Lower Peninsula; and Upper Peninsula.

When you register with the Million Pollinator Garden Challenge, your garden site is pinned to a map of North America. It’s fascinating to see all of those pins on that map and where the gardens are.

Our area of southeastern Michigan looks under represented to me. I’m not sure if it’s because of a lack of gardens or if it’s because gardeners are unaware of the program.

Let’s make our gardens pollinator friendly this year, get pinned on the map and show the world how much our region cares about helping pollinators.

Bob


Chamomile tea helps protect young seedlings

Filed under: Disease,Seed Starting — bob @ 7:11 am

In my last post we discussed damping off, a fungal disease that attacks and kills developing seedlings. A clean growing medium will minimize the occurrence of damping off.  And a seed starting mix can be pasteurized by pouring boiling-hot water through it.

Once the seeds have germinated and the newly emerged plants are off to a good start, there’s more you can do to protect those tender seedlings.

There’s plausible evidence showing some homemade concoctions can inhibit the growth of pythium, the fungus responsible for damping off. One of these is chamomile tea. That’s right, the same tea we brew when we feel like mellowing out with something warm to drink.

Steep at least two teaspoons of chamomile flowers into each cup of boiled water. Let the tea come to room temperature before straining and using. This is quite a bit stronger than what most people use to brew a cup of drinking tea. The stronger you make the tea the effective it is.


Chamomile grows wild in some gardens.

Chamomile grows wild in some gardens. Every year we collect chamomile for tea. 

Use a spray bottle to water your new seedlings by spritzing the tea over the plants and soil once a day. To help the tea be more effective, make sure you allow for plenty of air movement around your plants while they are growing.

Eventually Mother Nature will take over and you won’t need to use the tea anymore. As seedlings grow and get older they will outgrow their susceptibility to damping off.

Bob


Powered by WordPress