The Yellow Farmhouse Garden

April 18, 2007

Seedling time

Filed under: Uncategorized — judy @ 5:18 pm

Yesterday I was transplanting little seedlings. Actually, at one point I had ten people helping me transplant. We finished twelve flats of seedlings. Some of those flats had seventy-two seedlings in them. So you can say we had it down pat.

I planted those seeds two or three weeks ago, depending on what they were and how fast they germinated. They were sown in a 4″ square pot. I pay special attention to whether the seeds need to be covered with soil or planted on the surface. The seed pack will tell you. Then I put them on a heated bench in the greenhouse, which is ideal for them. At home you could use a heating mat or put them on a warm surface. For germinating seeds, a cold window sill is not the best place. But after they germinate, then they need sunlight.

When they’ve developed at least one true set of leaves (which are not the first leaves you see, those are the cotyledons), you can transplant them. But they are pretty small and hard to handle at that stage for most peoples. So, you can wait a little while untill they are bigger. Don’t wait too long, the smaller, the better for moving them. I like to carefully rest my fingertips on the soil surface and turn the whole thing up side down so it will slide right out. I then break up the soil in half, then quarters. By then the soil starts to crumble and I can pull the seedlings gently apart.

Separating Seedlings

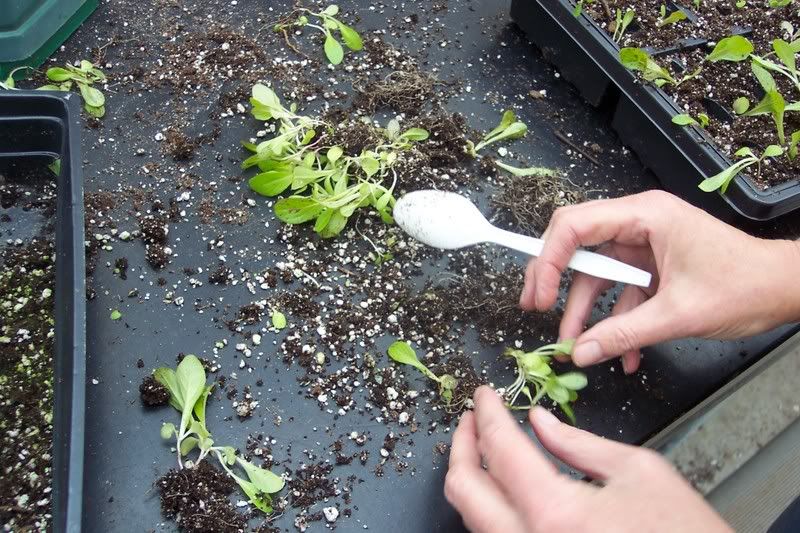
My golden rule, which my volunteers will tell you I enforce is, hold the seedling by a leaf, never the stem or growing tip. If a leaf breaks the plant can still grow, but if you crush the stem or the tip then that’s the end of it.

I use a plastic tray filled with seventy-two plastic cell packs in it. You can use yogurt containers or any other small containers to grow your seedlings in. Use a pencil or spoon to make a hole in the soil that is bigger than the roots of the seedling. Then while holding it by a leaf (remember!) pull the soil back around it gently just untill the seedling can stand upright on its own. You do not have to firm the soil alot. I ususally have to stop my new volunteers from trying to pack the soil down around them. The roots need loose soil to grow in.

Transplanting Seedlings

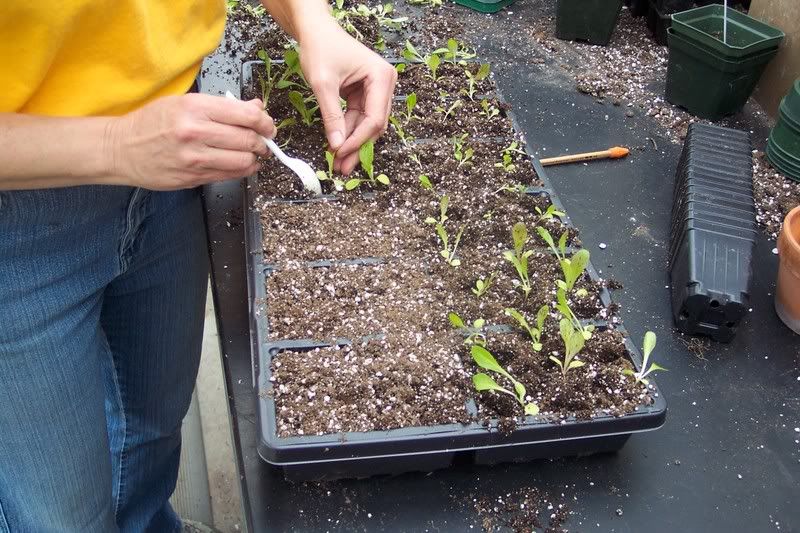
Then when you have the whole container filled with seedlings, water well. Put in a warm, shady place the first day, so they can recuperate. After that the seedlings need as much sunlight as you can give them in a house.

I actually use a soilless mix to start and grow my seedlings, but I will tell you about that another time.

Tell me in the comment section, what kind of recycled containers you use at home. Also where you have found warm spots in your house for germinating seeds.

Bye for now, Judy

April 17, 2007

Grapes are Pruned!

Filed under: Uncategorized — bob @ 3:58 pm

Boy. am I tired!!

I pruned all the grapes…it took all day. Notice that these are on a decorative arbor, not a standard arbor. The arbor is about 8 feet high and 99% of the vines are growing on top. So I have to climb on top of the arbor and stand on those 2 by’s, then bend down and prune.

I’m not complaining, mine you, I enjoy pruning grapes. I just wanted to give you feel for a day in the life of a gardener.

You saw the “before photo” a couple of posts ago. Here it is in progress:

Pruning grapes, in progress

Here it is at the end of the day today:

Done pruning grapes

This arbor is about 100 feet long.

You can’t see it in this photo, but I left the lower vines on the main trunk this year because I want to encourage them to grow like a conventional two wire system below. These are very vigorous Concord grapes and should be able to cover the entire arbor. I had this set up until two years ago, when I removed the lower wires thinking it would look more “artistic”. I like it better the original way with the wires.

Tomorrow I will be back in the greenhouse to transplant seedlings if it is rainy. Otherwise, I’m outside cleaning up the vegetable beds.

Speaking of beds, I think I’m going to bed early tonight.

Bob

April 16, 2007

Felco Pruner

Filed under: Uncategorized — bob @ 3:59 pm

I got a good start on those grape vines this afternoon and hope to spend most of the day tomorrow ( Tuesday) working on them.

My tool of choice for this job (and other pruning work) is the Felco#2:

Felco Pruner

I use the Felco on grapes because of the range of diameter of the vines that need to be cut. They typically range from pencil thickness to the diameter of your thumb (or even someone else’s thumb). It would be over-kill to use them on light pruning such as cutting perennials or flower stems.

This is an exceptional pruner made to very high standards. They are a bit pricey compared to the Chinese knock offs that are out there but are well worth the money. This tool should last you a lifetime. It even comes with a special wrench allowing you to replace the cutting blade if need be.

This model, the #2, is designed for people with medium to large hands. Felco makes models suited to folks with smaller hands as well.

The only problem I have with this tool is that it has a tendency to disappear. People like to “borrow” it without telling me, then never return it! One time I even had someone “swap” his old, abused Felco #2 (I think he liked to use it to cut fence wire) with mine, thinking I would never notice! Scheesh…

I used a Corona pruner for many years (and stiil have it). The Corona is a fine tool as well.

Bob

April 15, 2007

Artifical Sunlight

Filed under: Uncategorized — bob @ 12:44 pm

Those grow lights I wrote about in an earlier blog are used in our greenhouse mostly during the winter months to supplement natural sunlight. As the days grow longer we use them only to “brighten up” a dreary day this time of year.

HID Grow light
These lights are of the High Intensity Discharge type and produce very intensive light. The model we use is a two bulb system. One bulb (Metal Halide) creates the blue spectrum of light and the other (High Pressure Sodium)the orange spectrum. Together, these bulbs come pretty close to mimicking the spectrum of natural sulight, which means good growing conditions for your plants…even those that require high-light conditions.

HID Growlight

This type of fixture cannot be plugged directly into a wall outlet. It needs a Ballast to regulate the voltage for the lamp. It gets a little complicated from here how a Ballast works, with its transformer, capacitor and ignitor. Anyhow, the Ballast itself is then plugged directly into the household outlet.

Growlight Ballast

The light these lamps provide is so bright that we can hang them 3-1/2′ to 4′ above our growing plants and still provide all the light they need.

Our fixtures came from Charlie’s Greenhouse Supply. Purchasing these are not for the faint of heart… cost of the dual fixture $619.00, the ballast…$495.00, the sunlight they provide..priceless.

Other types of growlights are available, cool temperature florescent fixtures can be used for starting and growing seedlings. This type has to be place just a few inches above the growing plants to provide enough light. The advantage is their cost…maybe 1/10th the price of our HID lights.

We will discuss this subject in more detail later, perhaps in the fall as our outdoor season ends and we move back inside. In the mean time let’s enjoy the spring.

Bob

April 11, 2007

Figs in the South of Italy…or Michigan?

Filed under: Uncategorized — bob @ 4:42 pm

All of the snow we’ve been having has chased us indoors. That’s OK though, our indoors is a greenhouse.

It was so dark and dreary today that I turned on the high intensity grow lights during the middle of the morning and kept them on all day. The light really helps to improve one’s general mood.

I found something in the south end of the greenhouse that you may “get a kick” out of…figs!

These are Kadota figs from Stark Brothers Nursery:

Fig tree

The fig trees were delivered last spring as small seedlings but grew very fast and produced fruit by the end of the summer. That first flush of fruit fell off and we didn’t get to pick any figs.

We let the trees get frosted in the fall then brought them in before the weather really got cold. They dropped their leaves, so I stopped watering for a while to let them go dormant. I started watering them again in early December, if I remember correctly.

Now that spring has arrived, they have begun setting fruit again. The fruit is already larger than it was last summer.

Figs in April

So between the grow lights and the figs, I can imagine I’m in the south of Italy while I’m working!

Bob

« Newer PostsOlder Posts »

Powered by WordPress