The Yellow Farmhouse Garden

November 7, 2019

Planting bulbs in the fall for spring color

Filed under: Flowers — Tags: , , , , — bob @ 4:47 pm

Beginning gardeners may not realize that all of those beautiful tulips and daffodils that we see in the spring started out as bulbs that were planted in the fall.

Why couldn’t someone just get some bulbs and plant them in the spring like a potato and let them grow and bloom? Plants need certain conditions in order to grow and reproduce.

Flowering is part of the reproductive process, a distinct part of the life cycle of a plant. In order for that to happen, some plants require a cold period of a certain length. Bulbs need at least 12 weeks or even longer in order for the reproductive process to be triggered. Horticulturists call this cold treatment of plants “vernalization”.

Bulb producing plants that are planted in the fall are sometimes called “hardy bulbs”. Spring flowering bulbs like tulips, daffodils, crocus, hyacinths and many others fall into this category.

With just a few exceptions, all hardy bulbs should be planted in a well drained site where no standing water occurs at any time. If they’re kept high and dry, they will be more likely to survive from year to year.

I’ve had very little success in keeping a population of tulips going for any more than a few years even in sites that seemed to be perfect. However, years ago I had one small planting that did quite well in a sandy spot with very little topsoil. Daffodils and other bulbs are a different story, they can establish themselves permanently much easier.

Bulbs often come with instructions on the package on how how deep to plant and how far apart. The instructions will say something like, “plant the bulbs six inches deep”. Even gardening books and websites give the same advice. But what does that mean? Six inches to the bottom of the bulb or to the top of the bulb?

If the directions say “six inches deep”, that means the bottom of hole itself is about six inches deep. So larger bulbs like daffodils or tulips get covered with about four inches of soil. Small bulbs are planted shallower and are covered with about two inches of soil.

It may seem like a simple detail but always plant bulbs right-side up with the root end at the bottom and the top facing up, not sideways or upside-down.

There are gardeners who like to dig out the entire bulb planting area to the required depth and place their bulbs where they want them in the dug out area. They then cover everything back up. This works fine if the soil in the area has good tilth and is easy to dig. How big an area that is practical mostly depends on the gardener’s stamina.

Most gardeners prefer to dig small individual holes for each bulb. Many kinds of tools have been invented for this chore but the humble garden hand trowel is still the most used.

A garden knife or “hori-hori” works great to cut through plant roots in the soil. This one has depth markings.

Before planting, open up your package of bulbs and place each on the surface where you intend to plant it. To most people, bulbs look best if they are placed to look like they came up on their own rather than in straight rows. Resist the suggestion to toss the bulbs randomly to achieve that result, bulbs are somewhat fragile and may be bruised when dropped.

Place the bulbs in the spots where you intend to plant them. Here’s a mix of tulips and daffodils.

Once you’ve decided on a planting scheme, dig a hole to the proper depth and place the corresponding bulb at the bottom of the hole and cover it up. After a while you get a feel for it and will fall into a rhythm so the job is not so tedious.

If you are planting thousands of bulbs like I used to do, you may have to break out the big guns to help you with the job. An electric or gas powered drill with a two-and-a-half or three inch diameter soil auger chucked into it is a good investment for large expanses of bulbs.

Happy gardening! Bob
 

October 3, 2019

Native calico asters are the stars of fall

A fall favorite of mine is our native calico aster. It is found in all eastern US states and Canadian provinces.

Around our local area, I’m seeing more of these plants than usual. The relatively rainy growing season may have something to do with it since they prefer semi-damp environments. More frequent rain means that it will be more likely they will be able to establish themselves in spots where they wouldn’t be found in drier years.

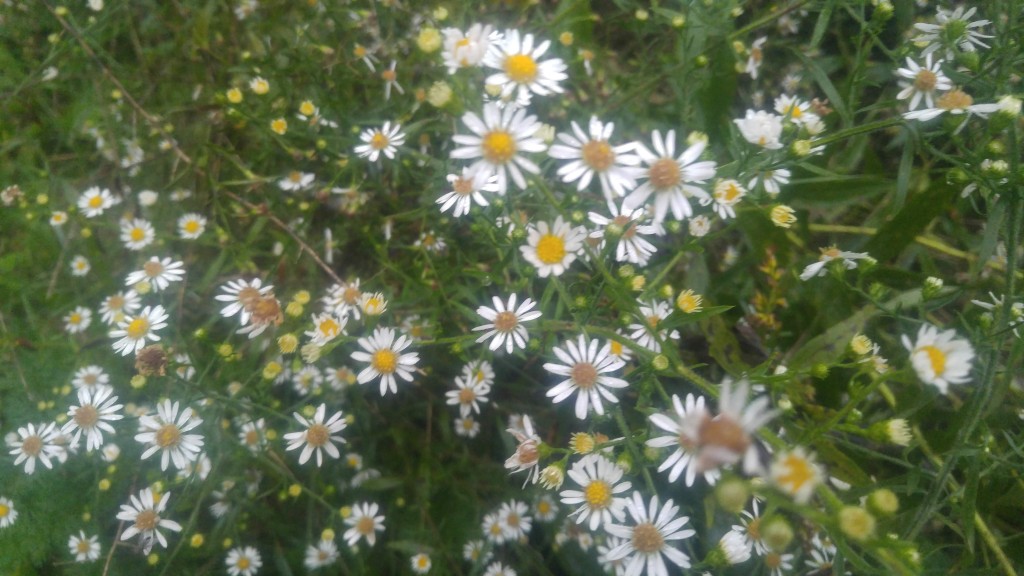
In late summer and early fall, these asters produce a display of 5/8-inch diameter, white flowers with pale yellow centers. You often find them along hiking trails, roadsides and the edge of fields. In my yard they’re popping up around my wood chip pile, an old compost heap and other places that don’t get touched by the mower that often. They range in height from about a foot to over five feet tall depending on their location and how long they have been growing there. They are perennials.

Even though they are not known for their scent, I sometimes can detect a faint sweet smell from mine if I put my nose right up against the flowers.

Calico asters are a good source of late season nectar for pollinators. I’ve noticed many honeybees and other small pollinating insects on mine. As the season progresses, the flower centers change colors as they age adding hues of pink, blue or maroon here and there, giving it a “calico” appearance.


The flowers are just starting to change colors.

The flowers are just starting to change colors.

Calico asters can be confused with other similar-looking species. However, if you look closely, you’ll notice the plant has another distinguishing characteristic, its flowers grow from only one side of the stems.

Mammals such as deer and rabbits sometimes browse on the foliage. Some species of butterflies and moths do too.

The stems are strong enough to stay standing through much of the winter adding interesting contrast to otherwise empty expanses of white snow.

These likable flowers make a great addition to a wildflower garden. Plant breeders have worked with them and have come up with improved varieties that are more tame and will look at home in your main flower garden.

Bob


September 19, 2019

Migrating monarch butterflies

In past years, goldenrod has received a bad reputation through no fault of its own. For decades, doctors implied their patient’s allergy symptoms were caused by goldenrod pollen when in fact, the actual culprit was ragweed.

The thinking behind it was ragweed flowers are relatively inconspicuous compared to flowers on other plants. Unless you’re really looking for it, ragweed can be hard to find. Goldenrod on the other hand, with its bright yellow flowers can easily be seen by a man on a fast horse. Since goldenrod blooms when ragweed is shedding pollen, it was simply easier to tell allergy sufferers to expect their symptoms to show up when goldenrod is out. Botanists would call this a phenological event. That’s when something goes on with one species of plant that is a signal for something else.

Goldenrod flowers produce large amounts of nectar so is always eagerly anticipated by beekeepers. A large goldenrod bloom can make the difference between no honey crop or a bountiful one. It is one of the last family of plants to remain blooming after others have stopped for the year.

Honeybees are not the only ones that take advantage of the nectar bounty. It’s an important fall food for wild pollinators and butterflies such as monarchs and other species.

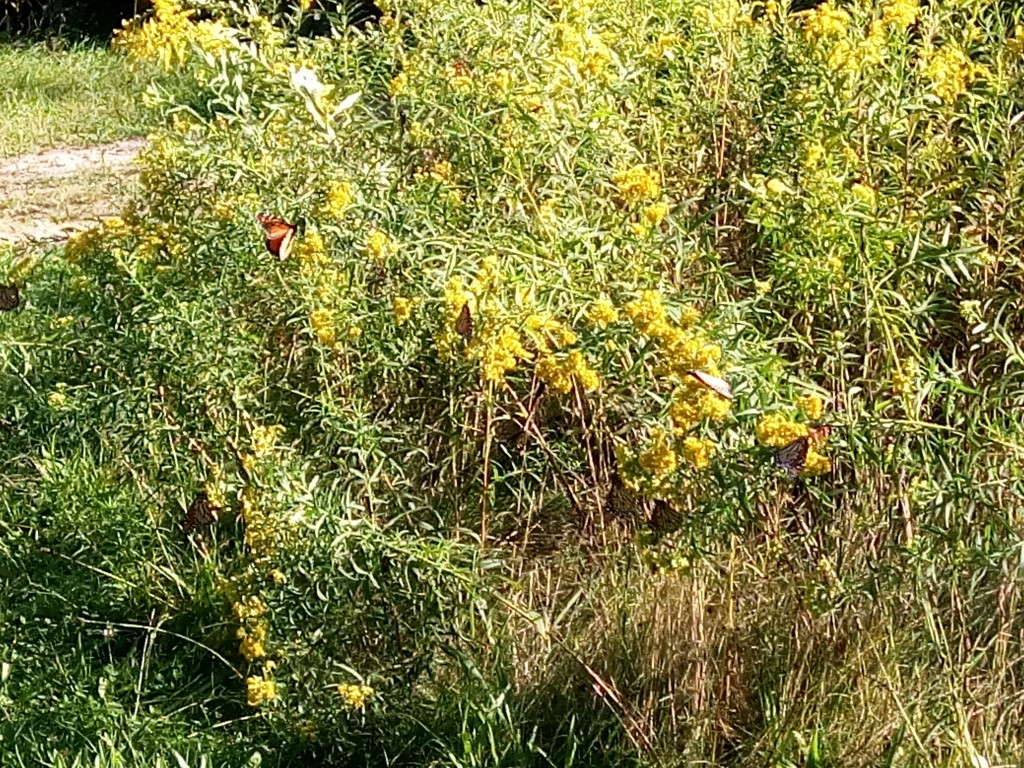
Earlier this week we were sitting on our front porch taking a break and noticed some movement in our wildflowers. Looking closer, we could see over twenty adult monarch butterflies feeding on nectar from the goldenrod growing in our yard.

Look closely, how many monarch butterflies can you see?

Look closely, how many monarch butterflies can you see?

Judging by what is happening in and around my stomping grounds, it looks like a good year for monarch butterflies.

The monarch migration is underway and coincides with the fall bird migration (and Michiganders heading back to Florida).

During our break we also watched a kettle of broad-winged hawks circling high in a thermal updraft. They were on their way south to their winter home. While watching the hawks, way up in the air we could see something passing by in and out of our field of vision through the binoculars. After re-focusing and zooming in on them, we discovered they were monarch butterflies!

More monarchs were flying just over the tree tops. It was a lot of fun watching them fly at those different altitudes instead of fluttering around the garden.

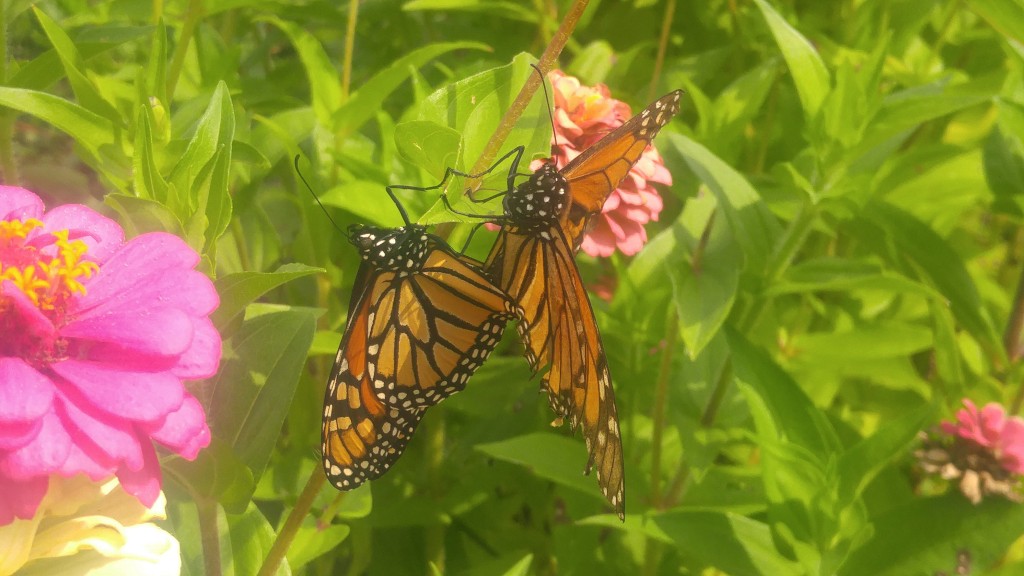
Pair of monarch butterflies mating in mid-September

Pair of monarch butterflies mating in mid-September

There are still quite a few caterpillars feeding on our milkweed plants too. We even spotted a pair of mating adults. That seemed late to me. The eggs will have to hatch; the caterpillars have to pupate; and the adults emerge before the weather gets too inclement for them to fly south. I’m not sure if they’ll have enough time to complete their life cycle this fall.

Bob


September 5, 2019

Be careful not to introduce invasive plants into your garden


It’s surprisingly easy to introduce an invasive plant into your garden. It often happens when gardeners share plants with one another.

We have a few examples of that happening in our garden. One of those is Pinellia tripartita a plant native to China and Japan. I’ve heard it called Japanese jack-in-the-pulpit, although there’s another plant goes by the same name. Crow dipper is another name. One website refers to it as green dragon, another calls it voodoo lily. Botanically speaking, it’s closely related to our native jack-in-the-pulpit.

Pinellia is a smallish plant only eight to twelve inches tall and can grow in a variety of environments as long as the soil is well-drained. In our garden it is growing as a weed in full sun. Actually, it is growing in the shade of taller sun-loving plants, it is flourishing under the peonies that we brought in from another garden.

It was present as a persistent weed in that original garden too. We thought we were very careful to remove any trace of the Pinellia when we dug the peonies – apparently that was not the case. Now six years later we are still fighting it.

Unlike the other weeds we’ve accidentally brought in, these we have been able to keep confined to one relatively small spot in our garden.

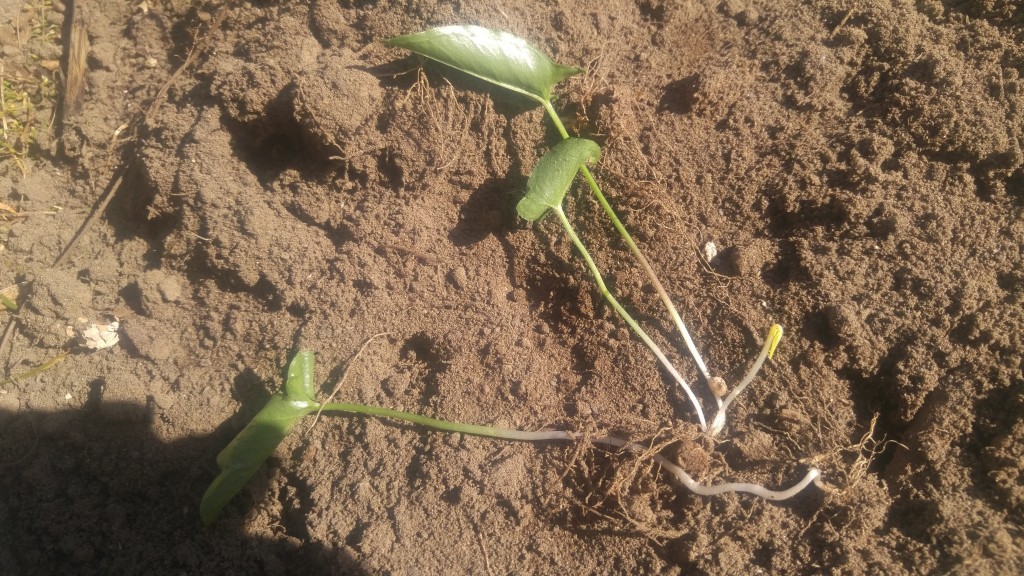
Pinellia is very well adapted for reproducing itself and is quite competitive growing among other plants. It produces both tubers and numerous seeds, making it doubly sure it will reproduce one way or another.

You can see the small tuber growing on the root. Each piece of plant will have at least one.

You can see the small tuber growing on the root. Each piece of plant will have at least one.

This past week we re-dug the peonies along with the infested soil they were growing in. The peonies we saved and replanted; the soil we bagged up and set it out for disposal in the landfill. Home composting will not destroy all of the seeds or tubers.

In some parts of the country people are planting it as an ornamental, it really is an unusual looking plant. Either it behaves itself in certain climates or it hasn’t become a big enough problem in those areas. People on gardening chat sites marvel how well it spreads without any effort on their part. In some states it is officially classified as a noxious weed.

Even though you can find reputable plant sources online extolling its virtues, I highly recommend against planting it. People say, “I’m a conscientious gardener and would never let it get out of control”. That may be the case but what happens if you move and sell your house, would the new owners be as vigilant?

There is a purple cultivar of Pinellia tripartita that is supposed to be non-invasive, I would never take a chance on that one either.

Bob


June 6, 2019

Prune off faded lilac flowers now

Filed under: Flowers,Shrubs — bob @ 9:43 am

Many of the lilacs I’ve seen have put on a nice show of flowers this spring. Some could have been even better if their owners had removed the spent flowers last spring.

Not many people are aware that deadheading lilacs is the best thing you can do for them to stimulate better flowers next year.

I don’t fault those who didn’t get around to doing that last year. If you remember, we had a wet spring last year and in the rush to get things planted, lilac deadheading was pushed far down on the list of gardening priorities.

Several years ago I was responsible for a dozen or more lilacs. My helpers and I always took the time to take off those spent blossoms and it really paid off. It’s another one of those delayed gratification things that gardeners always seem to be dealing with.

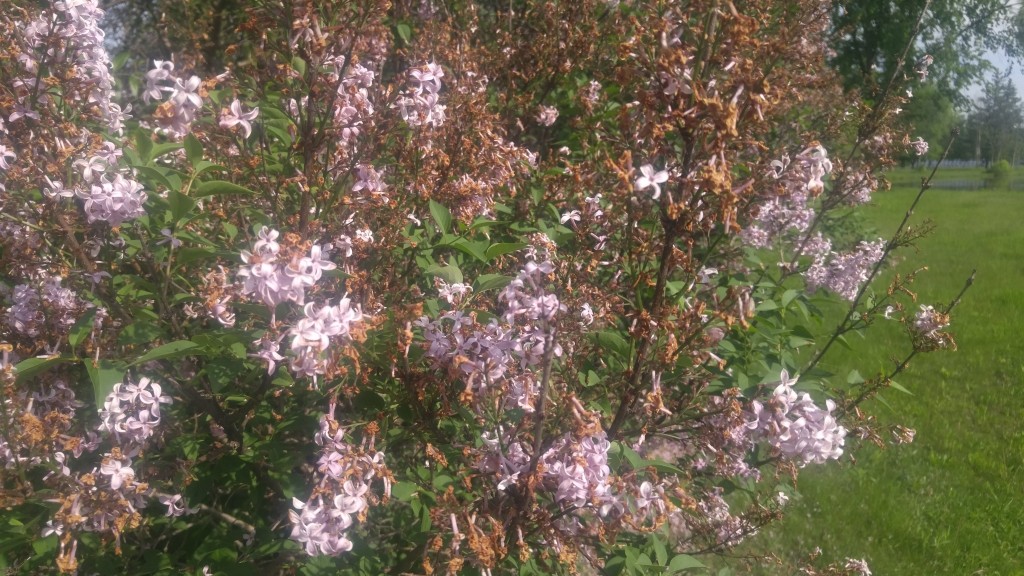
The ideal time to dead head lilacs is right after blossoming.

The ideal time to dead head lilacs is right after blossoming.

Deadheading is very easy work if you have a sharp pair of pruners. Just snip off the expired flower right at its base and let it fall. It can be time consuming on a large bush but after a bit you fall into a rhythm. To me it’s a satisfying job because you can see the old flowers accumulate on the ground as you work at it.  Plus you are aware that next year’s flowers will will be even showier.

Old lilac flowers never fall off. Instead their panicles turn brown as seeds begin to form making the shrub look messy. So taking off the old flowers also keeps your shrub looking nice and neat. To do the most good, deadhead before the seeds set. I like to do it just as the last of the flower color is left.

Don’t worry too much if can’t get around to snipping off the flowers, your lilac will still do fine without any attention. In addition to its reliable flowering habit, low maintenance is another reason why lilacs have remained popular since colonial times.

Lastly, a light application of fertilizer after deadheading will give your lilac the nutrients it needs to regrow its flowers buds.

Bob

« Newer PostsOlder Posts »

Powered by WordPress