The Yellow Farmhouse Garden

June 10, 2015

Dill weed is easy and fun to grow

Filed under: Herbs — bob @ 12:17 pm

Whenever I taste fresh dill in a dip or salad, it brings up memories of my childhood spending time with my Polish grandmother. During the growing season I remember her using dill for a lot of different things. As a result, the lingering scent of fresh dill hung in her kitchen all summer long. For that reason alone dill is one of my favorite herbs.

Another good reason to put it at the top of the list, besides the nostalgia factor,  is how easy it is to grow. In my garden, I have it coming up year after year on its own.

It all started several years ago when I had a bunch of dried dill umbels (tops) hanging up in the open air in a forgotten part of a shed. When I found them they had collected a lot dust and I was in no mood to try to clean them. How would you do that anyway?

So, I crunched them up with my hands  and threw the seed into every corner and edge of the garden. Ever since then, I’ve never had to worry about planting dill. They show up every where. I just have to make sure I leave a few plants to mature and drop seeds.

The normal way to start dill is to sow them in rows at the spacing of about 15 to 20 seeds per foot. It takes about a week to ten days for the seeds to emerge. Once they are up, thin them to about three plants per foot. You will have to keep the weeds down around it, just like the rest of your garden.

I have dill growing in the garlic bed. Once the garlic is gone, I'll let the dill finish growing.

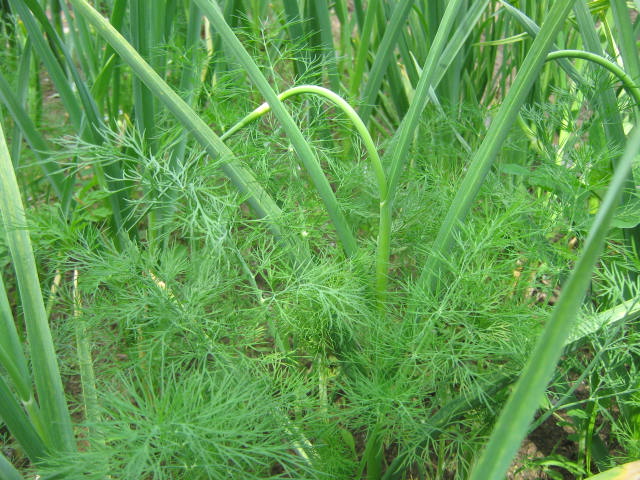
I have dill growing in the garlic bed. Once the garlic is gone, I’ll let the dill finish growing.

Keep in mind that dill typically grows to a height of three or four feet so it will shade shorter plants. That’s why I try to restrict my dill to the out of the way places in my garden.

Dill leaves — also called dill weed — can be cut and used anytime during the growing season. For dill pickles, harvest the umbels when the seeds are full size but haven’t turned brown. That’s the secrete for super flavorful dill pickles.

If you can’t use all of your dill right away, air-dry the umbels in the shade. Traditionally, the dried umbels are stored in glass jars but I suppose any air tight container will work. Besides, a glass jar of dill umbels sitting on your kitchen counter is very decorative and lets everyone know you are a real chef.

There is still time to sow dill seed.

Once you have your first crop of dill and remember to leave a few plants in the garden at the end of the season, you won’t have to plant it ever again.

Bob

December 3, 2014

Taking care of your holiday rosemary plant

Filed under: Herbs,Indoor Gardening,Potted Plants — bob @ 1:06 pm

Although nowhere near as popular as poinsettias, rosemary plants are becoming a favorite holiday plant.

Rosemary trimmed to a conical shape bears a striking resemblance to a miniature Christmas tree. Though it may look like it, rosemary is not related to pine, spruce or any other evergreen trees. It belongs to the mint family of plants which includes basil, thyme, mint and sage.

Just brushing against the leaves of  a potted rosemary releases its signature fragrance that can fill a room.

In most cases, fresh sprigs can be cut from a potted rosemary and be used in recipes calling for this herb. I say in most cases because sometimes plant growers apply systemic pesticides to their rosemary crop. In that case the rosemary is intended for ornamental use only and not for consumption. Always read the plant tag before assuming your plant is OK to use in the kitchen.

Don't assume your plant is safe to use for cooking, read the tag first.

Don’t assume your plant is safe to use for cooking, read the tag first.

Rosemary is fairly easy to care for if you pay attention to its watering needs. Even though it grows wild in the dry, arid regions of the Mediterranean, to thrive in a home environment, rosemary requires even moisture.

To water a potted rosemary, I like to immerse the entire pot into a bucket of water until the soil is completely saturated. If it floats in the bucket, I leave it in longer. I then set the pot into the kitchen sink to let excess water flow through. When no more water drains out, I know it’s safe to put it back in its foil wrapper or on its saucer.

A bucket is a good way to make sure your rosemary gets adequate water.

A bucket is a good way to make sure your rosemary gets adequate water.

Don’t be tempted to water it and let water stand in the saucer or wrapper thinking that is supplying even moisture. Standing water will drown and kill rosemary roots and eventually the entire plant.

On the other hand, don’t let the plant dry out. The stiff foliage doesn’t appear to wilt much when the plant gets dry, but damage can happen pretty quickly from lack of water.

Try this little trick: try to gauge how much your rosemary weighs before you water it. After the plant has drained in the sink, note how much heavier it feels when you pick it up. After a few times you’ll be able to have a good guess at how dry the plant is. If you’re not comfortable doing that, use a moisture meter — they’re relatively inexpensive and make a great Christmas gift!

Bob

May 3, 2014

Planting horseradish

Filed under: Herbs,Planting — bob @ 9:12 am

Horseradish is one of my favorite condiments.

These hot and spicy roots are in an entirely different category compared to hot pepper sauce. I know people who have no problem with the hottest pepper sauce but can’t seem to handle the pungency of fresh horseradish. Maybe it’s because the active ingredient in hot peppers is capsicum, while in horseradish it is mustard oil.

As it turns out, horseradish is a pretty simple herb to grow and is not picky about soil. Of course, like most other plants, the better the garden soil, the larger the yield. Once you get it going, it pretty much takes care of itself.

Right now, is the time to get your horseradish started.

Even though seed is sometimes available, nearly all horseradish is planted by root cuttings. Plant the root cuttings at an angle in a shallow trench, about an inch deep or so, and cover them with soil. Keep them watered during any dry spells.

Horseradish root cuttings must be planted right side up. It is standard practice to  make a straight cut ant the top of the root and a slanted cut at the bottom.

Horseradish root cuttings must be planted right side up. It is standard practice for farmers to make a straight cut at the top of the root and a slanted cut at the bottom when they collect root cuttings.

Although I’ve heard of many instances of horseradish getting out control and taking over an area, I’ve never had that problem. The plants can easily reach a height of two feet or more. Two or three plants are enough for most households.

Horseradish roots are harvest during the fall after the first hard freeze.  I prepare horseradish the same way most folks do by grating the roots and mixing it with vinegar.

Bob


November 30, 2012

Bringing in Rosemary for Winter

Filed under: Herbs — bob @ 4:34 pm

Last spring, I had a rosemary plant in a six inch pot that over-wintered in the garage.  It looked like it could use a vacation, so, I took it out of its pot and planted it directly into the garden.

While in the garden, it suffered the regular abuse that you expect a rosemary plant to endure.  Whenever I needed rosemary for cooking, I pulled off  leaves. Also, I tore off a few stems to use for starting some new plants from cuttings. It certainly didn’t get coddled during the summer.

Some stems look vigorous while others look stressed on my rosemary.

This fall it survived those nights when the temperatures  dipped down into the teens. Normally, rosemary can’t deal with our harsh winter temperatures. I have in the past, had one or two, by chance,  survive a mild winter.

This week, I finally decided to dig and re-pot this tough little plant. Despite all of the abuse and neglect, the roots grew large enough to fill a 12 inch pot. Also, the dead and damaged stems needed some pruning.  Otherwise, it looks to be in pretty good shape.

I was careful to leave the root-ball intact when digging my rosemary.

The plant grew large enough to need this 12 inch recycled plastic pot.

My plan is to let it rest in our cool, dimly lit garage over winter, just like last year and plant it out in the garden again next spring.

Bob

June 15, 2012

Drying Some Early Harvested Cilantro

Filed under: Herbs — bob @ 3:45 pm

It has been pretty dry in the garden for the past several days. The plants have begun to show a little drought stess but I’ve been able to keep up with watering.

I took advantage of the dry weather by drying some cilantro. I had some that was started early and needed to be harvested.

There was way too much to use fresh so, on Monday,  I gathered them up in a bunch and set them outside on a wire-top table. The bunch stayed there day and night. Today, Friday, the cilantro was dry and ready to go.

The leaves stay on the stems when drying in bunches like this.

I took  a clean trash bag and slipped it over the bunch.

A new garbage bag works great for collecting cilantro leaves.

By rubbing my hand over the stalks, I was able to easily separate the leaves from the stems. The dried leaves fell into the bag and in five minutes I was done.

Now I have more dried cilantro than I know what to do with.

I compared the price of dried cilantro for sale on Amazon with the amount I managed to gather. Wow! Talk about getting a feeling of satisfaction.

Bob

« Newer PostsOlder Posts »

Powered by WordPress